In my older post (Insert Into Multiple Tables using Bounded TaskFlow in ADF ) the use case I had shown is having a drawback like data from table got automatically populated (as Shown Below) as user navigates to the bounded taskflow region from main page for creating a new Employee. In this blog I am trying to make some modification in my ViewController project so that the issue got resolved.

Step1: Create a Bounded task flow and make sure that 'Create Train' is selected.

Step 2: Drag View from Component palate and rename it likes below. Please follow my previous post (Insert Into Multiple Tables using Bounded TaskFlow in ADF and refer Figure 2 to Figure 6 ) to create those pages. Make sure those page extension should be *.jsff instead of *.jspx.
Add train Button and Train Button Bar for all pages in Task Flow like below

After completing all jsff pages bounded task flow will look like below.

Add valid name for all View id in Task Flow document source (task-flow-definition.xml)

Step 3: Modify Employee.jspx page
In my previous post (Insert Into Multiple Tables using Bounded TaskFlow in ADF) we have used Command Links for creating Employees Please refer to Figure 1 for this post. Now we can make it more fancy by using images and user can click on it to navigate to taskflows.
I have used images like for  (AddProfile.PNG) Adding Employee,
  for searching Employee,
  for editing Employee

We can use popupFetchListener and attach it to our managed Bean using a method so that the method will execute at the time the popup rendered
- public void fetchPopupListener( PopupFetchEvent popupFetchEvent) {
- System.out. println ("In Fetch PopUP Listener"); //Create Insert For Baisc Info
- BindingContainer bindingsbasic = BindingContext . getCurrent() . getCurrentBindingsEntry() ;
- OperationBinding operationBindingbasic = bindingsbasic. getOperationBinding ("CreateInsertBasic");
- Object resultbasic = operationBindingbasic. execute() ; //Create Insert For Contact Info
- BindingContainer bindingscontact = BindingContext . getCurrent() . getCurrentBindingsEntry() ;
- OperationBinding operationBindingcontact = bindingscontact. getOperationBinding ("CreateInsertContact");
- Object resultcontact = operationBindingcontact. execute() ; //Create Insert For Master Info
- BindingContainer bindingsmaster = BindingContext . getCurrent() . getCurrentBindingsEntry() ;
- OperationBinding operationBindingmaster = bindingsmaster. getOperationBinding ("CreateInsertMaster");
- Object resultmaster = operationBindingmaster. execute() ; //Create Insert For Baisc Info
- BindingContainer bindingsedu = BindingContext . getCurrent() . getCurrentBindingsEntry() ;
- OperationBinding operationBindingedu = bindingsedu. getOperationBinding ("CreateInsertEducation");
- Object resultedu = operationBindingedu. execute() ; //Create Insert For Job Info
- BindingContainer bindingsjob = BindingContext . getCurrent() . getCurrentBindingsEntry() ;
- OperationBinding operationBindingjob = bindingsjob. getOperationBinding ("CreateInsertJob");
- Object resultjob = operationBindingjob. execute() ;
- }
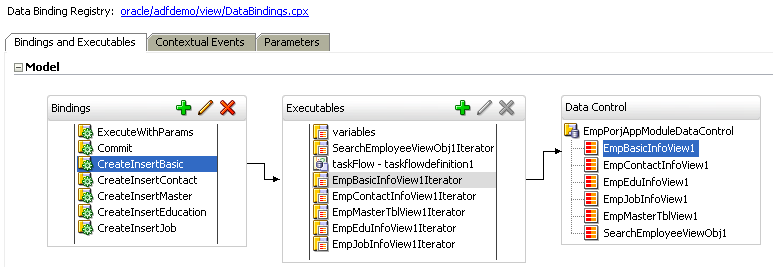
But Make sure that you are having below bindings created in
Drag newly created task-flow-definition to the dialog and it will display the dialog below

We can test the page and it comes like this